Besides the design and font, a crucial yet often overlooked element is the embossing angle when selecting a custom book embosser. The embossing angle determines the direction from which the impression is made on the paper, directly impacting the final product’s professionalism, aesthetics, and practical application. Choosing the wrong embossing angle can result in incomplete impressions, damage to binding materials, or an outcome that appears clumsy and inelegant. This article provides a comprehensive guide to embossing angles, explaining their definition, the ideal scenarios for each angle, key factors to consider when choosing, and how to make a final decision.

1. Understanding the Core Concept: What is an Embossing Angle?
Before delving into specific angles, we must first precisely understand the meaning of the “embossing angle.”
- Technical Definition: The embossing angle refers to the orientation of the embossing plates (the metal plates carrying your custom design) inside your custom embossing stamp. This orientation determines the direction from which pressure is applied to the paper when you close the embosser’s handle. Think of it like a stamp: you can stamp from top to bottom (top angle) or from the side (left or right angle).
- Relationship with Binding: The choice of embossing angle is inextricably linked to how the material is bound. For materials with a bound edge, such as books, manuals, or binders, the embosser’s “jaws” (the opening where the paper is inserted) must be able to fit over the binding unobstructed for the impression to land accurately on the intended page. Therefore, the embossing angle is essentially about accommodating the binding method to ensure a smooth embossing process.
- The Importance of Visualization: Visualize the embossing process clearly. Suppose you want to emboss a page in a book. The book is bound on the left; you cannot approach the page with the embosser seal from the left side because the spine will block it. Your only options are to approach from the top, right, or bottom of the book. This simple logic is the foundation for understanding all angle choices.
2. Detailed Explanation of the Four Embossing Angles and Their Best Use Cases
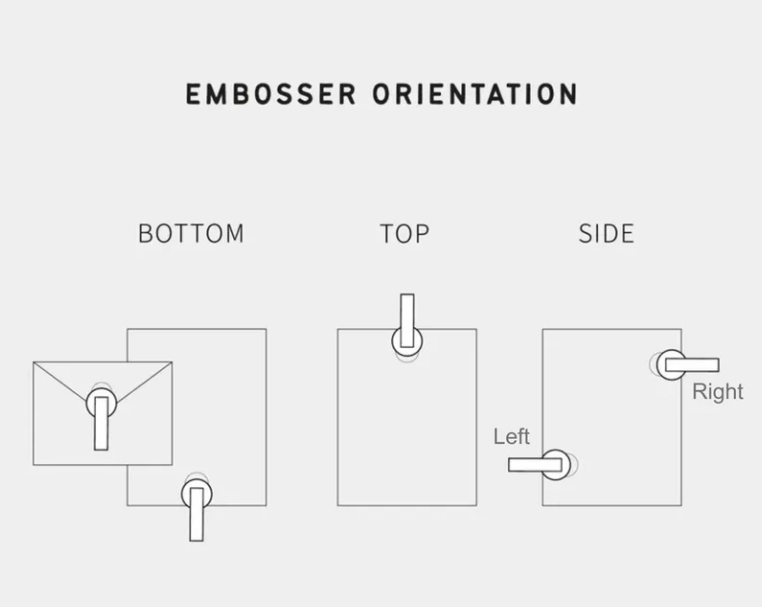
Most personalized book embossers on the market offer four standard angles: Right, Top, Bottom, and Left. Each has its unique purpose and ideal situation.
A. Right Embossing Angle
- Description: This is the most common and versatile embossing angle. When this angle is selected, the impression is made from the right side of the page towards the left. The embosser’s jaws are inserted from the right side of the page.
- Ideal Use Cases:
- Pages of Left-Bound Books: This is its primary use. For standard left-bound books, magazines, reports, or photo albums, the right angle is the natural and only ergonomic choice. It easily reaches the right half of the page.
- Right Edge of Single Sheets: When you need to emboss the top right or bottom right corner of a single sheet (like letterhead or certificates), the right angle is also perfectly suitable.
- Specific Locations: Ideal for impressions on the top right corner (a classic location for company letterhead) or the bottom right corner of a page.
- Advantage: Highest versatility; the default choice for most standard bound materials.
B. Top Embossing Angle
- Description: When this angle is selected, the impression is made from the top of the page downwards. The embosser’s jaws are placed over the top of the page vertically.
- Ideal Use Cases:
- Top Center or Top Right of a Page: The top angle is the only choice if you want the impression positioned at the very top center of a page. This is common for the top center of certificates, awards, or the top of invitations.
- Top-Bound Materials: For specially bound materials where the binding is at the top, such as top-bound calendars, notepads, or reports, the top angle is necessary as other angles are inaccessible.
- Long Pages in Books: For very wide or long book pages, if you want the design centered at the top of the page rather than偏向ing to the right, the top angle provides better visual balance.
- Advantage: Allows for a centered, formal impression at the top of a page; suitable for special bindings.
C. Bottom Embossing Angle
- Description: Opposite to the top angle, this angle creates an impression from the bottom of the page upwards. The embosser’s jaws are inserted from the bottom edge of the page.
- Ideal Use Cases:
- Bottom Center or Bottom Right of a Page: This is ideal for adding a seal, signature, or date to the bottom of certificates, official documents, or book pages. A bottom-center impression appears very formal and balanced.
- Bottom-Bound Materials: Although uncommon, some art books or special folders might be bound at the bottom, making the bottom angle the only feasible option.
- Complement to the Right Angle: In a left-bound book, if you want the impression on the bottom right corner of some pages, but the book’s layout or margins make approaching from the right difficult, approaching from the bottom might be a better solution.
- Advantage: Offers a subtle and elegant imprint location, especially suitable for formal notations at the bottom of documents.
D. Left Embossing Angle
- Description: This is the least common and most specialized embossing angle. The impression is made from the left side of the page towards the right.
- Ideal Use Cases:
- Right-Bound Books or Materials: This is the primary reason for the left angle’s existence. It is used for books bound on the right side, which is more common in some Middle Eastern languages (like Arabic, Hebrew) or special publications read from right to left.
- Left-Bound Binders: Some three-ring binders or specially designed folders might have the binding mechanism on the left; a left-angle embosser is needed to emboss the left area of the inner pages.
- Top Left Corner of Single Sheets: For a single sheet, if you need to emboss its top left corner and the sheet is large enough to accommodate the embosser’s jaws from the left side, this angle can be used.
- Important Note: For the vast majority of standard left-bound materials, the left angle is completely ineffective because the binding spine blocks the embosser’s jaws. Unless you have a specific, clear need for right-bound materials, you should not choose this angle.
3. Beyond the Basics: Key Factors to Consider When Choosing an Embossing Angle
Simply knowing the four angles is not enough. Making an informed decision requires deeper consideration.
- Factor 1: The Binding Method of Your Material
- This is the deciding factor. Before ordering an embossed stamp, identify the primary type of material you will be embossing. Is it standard left-bound books? Top-bound calendars? Or single sheets of cards? Your answer will directly point to the correct angle.
- Factor 2: Desired Impression Location
- Where exactly on the page do you want the design to appear? Top right corner? Bottom center? Or directly on top? Different locations correspond to different angles. Take a sample material and mark your desired spot with a pen. Then, think about from which direction you can most directly and smoothly reach that spot.
- Factor 3: Ergonomics and Ease of Use
- Some angles might be more ergonomic to operate. For example, embossing page by page in a heavy book using the right angle is often less strenuous than constantly repositioning the book for the top angle. Consider your workflow and the convenience for batch operations.
- Factor 4: Versatility vs. Specialization of the Embosser
- If you plan to use the embosser for only one specific type of material (e.g., only for company letterhead), then choose the single angle that best matches that need.
- However, if you want the embosser to be useful in multiple scenarios (e.g., both book pages and single greeting cards), then the right angle is generally the safest choice for versatility. It can handle most embossing needs for left-bound books and the right side of single sheets.
4. Decision-Making Process and Frequently Asked Questions
Decision Flowchart:
- Ask yourself: How is the material I want to emboss bound?
- Left-bound -> Prioritize the Right Angle. Then evaluate if the Top or Bottom angle better suits your desired location.
- Top-bound -> Must choose the Top Angle.
- Bottom-bound -> Must choose the Bottom Angle.
- Right-bound -> Must choose the Left Angle.
2. Double-check: Can the desired precise impression location be easily achieved with the selected angle?
3. Final review: If I might work with other types of materials in the future, will this angle still be suitable? Do I need to compromise for the sake of versatility?
Frequently Asked Questions:
- Q: Can I buy an embosser that allows me to switch angles?
- A: Standard manual desktop embossers are typically fixed-angle. To change the angle, you would need to purchase a completely new machine. This is because the embossing plates are permanently installed inside the machine in a specific orientation. There are no universal “adjustable-angle” consumer-grade embossers.
- Q: What happens if I choose the wrong angle?
- A: The most direct consequence is that the embosser will be completely unusable for your intended material. For example, a left-angle embosser cannot emboss a left-bound book because the bound edge blocks the entrance. This would render your investment wasted.
- Q: Which angle is the most popular?
- A: Without a doubt, the Right Embossing Angle is the best-selling choice globally because it covers the most common left-bound materials.
Conclusion
Choosing the correct embossing angle is not a complex puzzle, but it requires a conscious, needs-based decision-making process. By understanding the nature of the angles, familiarizing yourself with the best use cases for each, and carefully evaluating the specific materials you will handle, you can ensure you invest in an embosser that perfectly meets your needs and will provide years of satisfactory service. When in doubt, remember this golden rule: The binding edge of the material dictates the embosser’s entry point, and the entry point dictates the embossing angle you need.